Getting Started with Multisite - Part 2: Activation
Part 1: Why Multisite?
Part 2: Activation
Part 3: Configuration and Comparison
In this next section I'm going to talk about how you actually activate the Multisite feature. It's not something that's exposed within the WordPress dashboard, but it's also not as hard to activate as you might think. But first we need to decide how we want to create new sites, either as subfolders or subdomains.
Subfolder Multisite creates new sites after the main domain URL, so yourdomain.com/newsite1, yourdomain.com/newsite2, etc. On Reclaim Hosting the WordPress installer actually offers you this as an option, although for the purposes of this tutorial I'll be showing you how to set it up from scratch. One thing to be aware of with subfolders is that the potential exists for pages and posts at the main domain to conflict with subsites in your network. What that means is that if you have an "About" page at yourdomain.com/about you can't also have a new site called "About" because the URL would conflict. For that reason WordPress will prevent you from converting an existing site to subfolder Multisite, it has to be a new installation. However, we also have the option of subdomain Multisite which is recommended but a bit more complex.
I should mention if you're unsure what a subdomain is versus a subfolder there's a great tutorial at http://docs.reclaimhosting.com/Domain-Management/Subdomains-and-Subfolders/ that is worth a read. Subdomains provide a different URL structure for your new sites with the site name at the beginning, such as newsite.yourdomain.com, newsite2.yourdomain.com, etc. Because new sites have a custom URL we avoid the possibility of conflict between pages on the main domain and new sites. There is an extra step we'll have to take a bit later to set this up but for now let's get Multisite active on our domain.
To activate Multisite you'll need to access the files on your hosting account, either through an FTP program or using the File Manager in cPanel (here's another good tutorial on managing files in your account). The file we want to edit is wp-config.php which should exist if you've already installed WordPress which I'll assume for the purposes of this guide that you have (if not go do that first, and oh hey, this document will show you how). Scroll towards the bottom of that document and you should see a line that says:
/* That's all, stop editing! Happy blogging. */
What we need to do is add a line above that with the following code:
/* Multisite */
define( 'WP_ALLOW_MULTISITE', true );
The first line is just a comment to tell us where our Multisite functions are. The second line is the actual code to activate Multisite in our WordPress installation. Go ahead and save your file and login to WordPress.
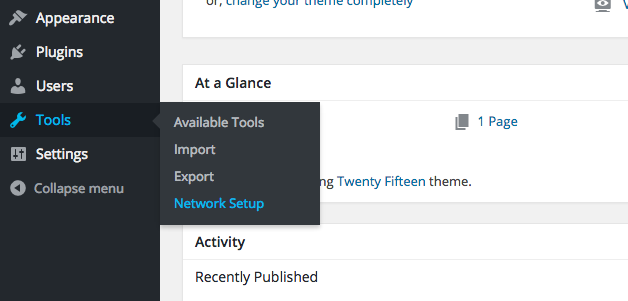
At first glance nothing appears different. However if you navigate to Tools you'll see a new menu item, Network Setup. Go ahead and click that.

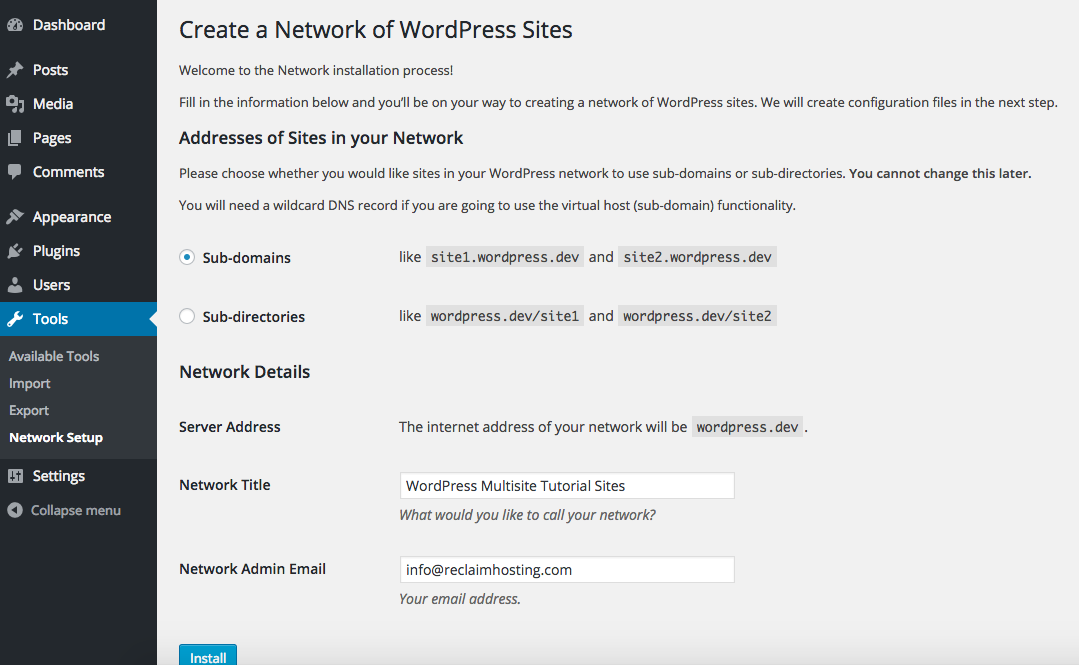
You'll see on the following page the option to choose between subdomain and subfolder Multisite that we discussed earlier (unless this is not a new installation in which WordPress may only offer you the subdomain option). You'll also be asked to create a name for your Multisite Network and the email address for the administrator. Pretty straightforward stuff.

Once you've chosen which option you prefer and filled out the information you can click install. In this case I've chosen Sub-domains (and we'll say a prayer for WordPress developers that they learn how to spell it one day soon) and clicked Install.
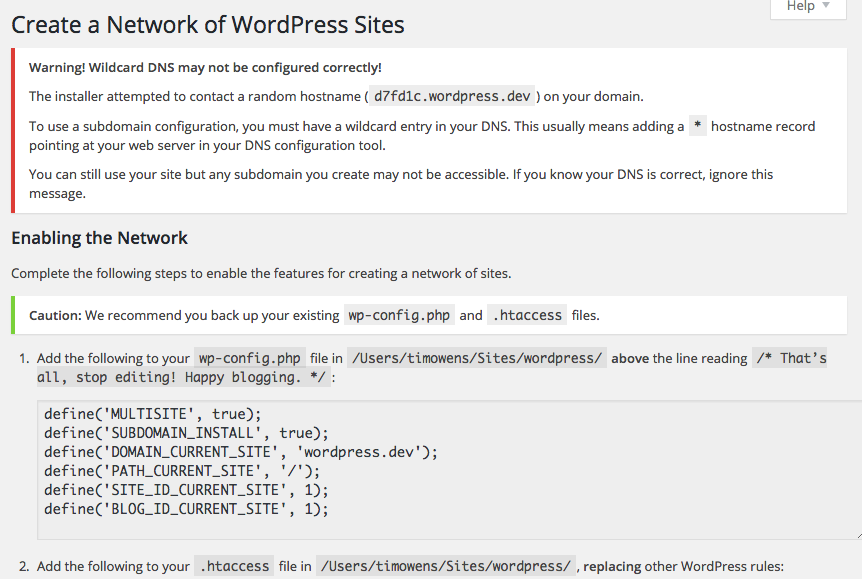
WordPress now has two bits of code that need to be added to two different files. The wp-config.php code gets the following (for subdomain installs):
define('SUBDOMAIN_INSTALL', true);
define('DOMAIN_CURRENT_SITE', 'wordpress.dev');
define('PATH_CURRENT_SITE', '/');
define('SITE_ID_CURRENT_SITE', 1);
define('BLOG_ID_CURRENT_SITE', 1);
And the .htaccess file gets this code, which can replace whatever code may have been added there previously by WordPress:
RewriteBase /
RewriteRule ^index\.php$ - [L]

# add a trailing slash to /wp-admin
RewriteRule ^wp-admin$ wp-admin/ [R=301,L]

RewriteCond %{REQUEST_FILENAME} -f [OR]
RewriteCond %{REQUEST_FILENAME} -d
RewriteRule ^ - [L]
RewriteRule ^(wp-(content|admin|includes).*) $1 [L]
RewriteRule ^(.*\.php)$ $1 [L]
RewriteRule . index.php [L]
Note: If you don't see an .htaccess file make sure that hidden files are being shown. In cPanel when you open the File Manager it will ask if you want to show hidden files, other FTP clients may have the option somewhere in the settings. If you try to create the .htaccess file and it gives an error this it's likely because it's there but hidden.

Because I chose subdomains for my Multisite setup I need to make one other configuration change that subfolders don't require. You'll notice that I have an error because WordPress is checking to see if it can create a subdomain for me and it's not able to. In cPanel normally you have to setup a subdomain in advance before creating a new site with that subdomain which is why we're getting that error. However there's a trick to give this WordPress install the freedom to create subdomains for us so we don't have to do it everytime manually. We can create what's called a wildcard subdomain.
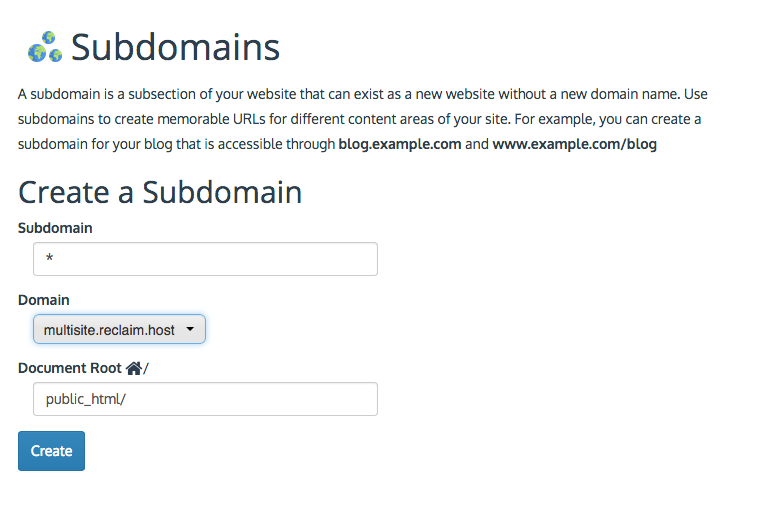
In cPanel if you go to Subdomains we can create one with the name * (just an asterisk) and we'll make sure the location for the subdomain on our webserver is the location of the WordPress install we did, in this case public_html.

Once you've created that wildcard subdomain the error should go away, however it might take a few hours for it to begin working properly so be aware of that.
That's all there is to activating Multisite in WordPress, a few additions to wp-config.php and .htaccess and one change in cPanel and you're all set! In Part 3 we'll be configuring some of the various settings in Multisite for the Network and looking at how it functions compared to a normal WordPress install.